Older versions of this plugin may not be safe to use. Please review the following warnings before using an older version:
ANCHORE ENGINE USERS NOTICE
- As of 2023, Anchore Engine is no longer maintained. There will be no future versions released. Users are advised to use Syft and Grype.
- Future versions of this Jenkins plugin may break support for existing anchore-engine installations. No timeframe is scheduled.
Anchore is a container inspection and analytics platform that enables operators to analyze, inspect, perform security scans, and evaluate custom policies against container images. The Anchore plugin can be used in a Pipeline job or added as a build step to a Freestyle job to automate the process of running an anchore analysis, evaluating custom anchore policies against images, and performing image anchore security scans.
Anchore has been designed to plug seamlessly into the CI/CD workflow. A developer commits code into the source code management system. This change triggers Jenkins to start a build which creates a container image.
In the typical workflow this container image is then run through automated testing. If an image does not meet your organization’s requirements for security or compliance then it makes little sense to invest the time required to perform automated tests on the image, it would be better to “learn fast” by failing the build and returning the appropriate reports back to the developer to allow the issue to be addressed.
The plugin uses Anchore to scan a container image. It interacts with your Anchore deployment via its API. The usage model generally conforms to the following flow:
- A Jenkins job will build a container image, and push the image to a registry that is pre-configured in your Anchore deployment (see pre-requisites below)
- The anchore build step will interact with your Anchore deployment by 'adding' the image (which instructs your Anchore deployment to pull the image from the registry), and then performing a policy evaluation check on the image. The build step can optionally be configured to fail the build if the policy evaluation results in a 'STOP' action.
- The plugin will store the resulting policy evaluation results with the job, for later inspection/review
The plugin can be used in Freestyle and Pipeline jobs.
Before getting started
- Anchore must be installed within your environment, with its service API being accessible from all Jenkins workers. Click here to get started with Anchore
- A docker registry must exist and be configured within Anchore, as the plugin will be instructing your Anchore deployment to pull images from a registry.
- All authentication credentials/Anchore API endpoint information must be available as input to the plugin at configuration time.
Once the plugin is installed, configure the plugin to interact with Anchore in Jenkins global settings or at build time.
Anchore plugin is published in the Jenkins plugin registry. Follow this guide and install Anchore Container Image Scanner Plugin
Configuring the plugin in Jenkins global settings makes it available to any Jenkins build using the plugin. The plugin can also be configured at the build time which overrides the global settings if any. The build time overrides are applicable only to the specific build
For global settings, go to the Manage Jenkins > Configure System view and look for Anchore Container Image Scanner section
- Input Anchore Enterprise URL to point to your Anchore installation
Note: Ensure that the /v2 route is included in the URL or /v1 if using a pre v4.9 version of Enteprise.
- Input Anchore account username and password for Anchore Enterprise Username and Anchore Enterprise Password respectively
- (Optional) If your Anchore deployment uses a user created certificate that is not signed by a standard certificate authority then select uncheck Verify SSL
- (Optional) For a verbose log of plugin execution check Enable DEBUG logging
The Anchore plugin can be added a build step for a Freestyle or Pipeline build. Typically the flow is as follows.
A Jenkins job will:
- Build a container image
- Push the image to a Docker Registry, typically a staging registry for QA
- Use Anchore plugin in a Pipeline job or add Anchore Container Image Scanner build step to a Freestyle job to instruct your Anchore deployment to analyze the image
- Anchore downloads (pulls) the image layers from the staging registry
- Anchore performs analysis on the image
- Anchore performs a policy evaluation on the image.
- The Anchore plugin polls the Anchore API for a user defined period until the analysis and policy evaluation is complete
- Based on user configuration, the Anchore plugin may fail the build in the case of a Policy violation or allow the built to continue with warnings.
When run, the Anchore plugin will look for a file named anchore_images in the project workspace. This file should contain the name(s) of containers to be scanned and optionally include the Dockerfile.
See here for documentation on the plugin pipeline command.
Note: These examples use scripted pipeline snippets, but the specific commands can also be used in declarative pipeline scripts.
These examples take a single, publicly-available image tag ('debian:latest'), put it into a file, and send that file to Anchore for analysis with various analysis options specified.
This first example imagines a scenario where your team is just getting started with Anchore, and anticipates that the tool will find some issues that will need to be fixed. In order to not block the CI build until those issues have been fixed, the bailOnFail parameter has been temporarily set to false.
node {
  def imageLine = 'debian:latest'
  writeFile file: 'anchore_images', text: imageLine
  anchore name: 'anchore_images', engineCredentialsId: 'my_credentials_id', bailOnFail: false
}
Once the issues identified by the scan have been fixed that parameter should be set (or removed so it can default) to true. This will help prevent new security issues from being introduced.
node {
  def imageLine = 'debian:latest'
  writeFile file: 'anchore_images', text: imageLine
  anchore name: 'anchore_images', engineCredentialsId: 'my_credentials_id'
}
However, other teams within your organization are now starting to use anchore to analyze the images they are building. This has the potential to introduce many more images into the system, but you may want to be able to easily generate reports that only highlight the results of scans on your team's images. Annotations are a great way to do that! Using annotations, you can easily filter Anchore search results to only return data about the images you are concerned with.
To update your pipeline to include annotations on images your team is building, do the following.
node {
  def imageLine = 'debian:latest'
  writeFile file: 'anchore_images', text: imageLine
  anchore name: 'anchore_images', engineCredentialsId: 'my_credentials_id', annotations: [[key: 'image_owner', value: 'my_team']]
}
As your organization's DevOps maturity progresses, you may find that you not only want to report on image scan data from different teams differently, you may also want to customize those scans to more closely control how the images you are developing are being scanned.
Information about how to customize policy bundles is available here. To apply a specific policy bundle to your image scans, not the unique UUID of your policy and update your pipeline script as shown below.
node {
  def imageLine = 'debian:latest'
  writeFile file: 'anchore_images', text: imageLine
  anchore 'anchore_images', engineCredentialsId: 'my_credentials_id', annotations: [[key: 'my_key', value: 'my_value']], policyBundleId: 'myUUID'
}
In the example below an Execute Shell build step is used to build and push a container image to a local registry.
TAG=$(date "+%H%M%S%d%m%Y")
IMAGENAME=build.example.com/myapp
docker build -t $IMAGENAME:$TAG .
docker push $IMAGENAME:$TAG
We will add a single line to create the anchore_images file that is read by the Anchore plugin
Note: Multiple lines can be added if the build produces more than a single container image.
TAG=$(date "+%H%M%S%d%m%Y")
IMAGENAME=build.example.com/myapp
docker build -t $IMAGENAME:$TAG .
docker push $IMAGENAME:$TAG

# Line added to create anchore_images file
echo "$IMAGENAME:$TAG ${WORKSPACE}/Dockerfile " > anchore_images
After the image has been built and pushed to the staging registry the Anchore plugin should be invoked.
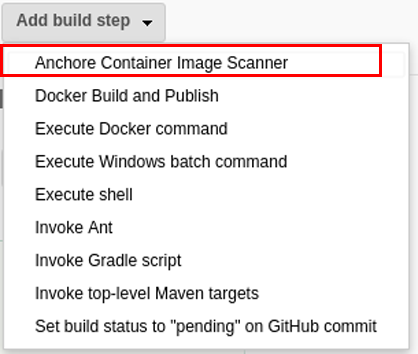
Dropdown Add build step and select the Anchore Container Image Scanner
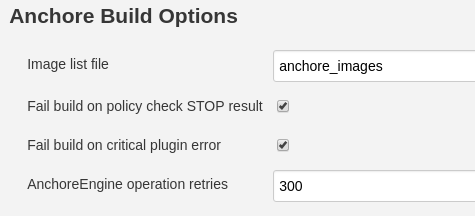
A new build step labeled Anchore Build Options will appear in your job
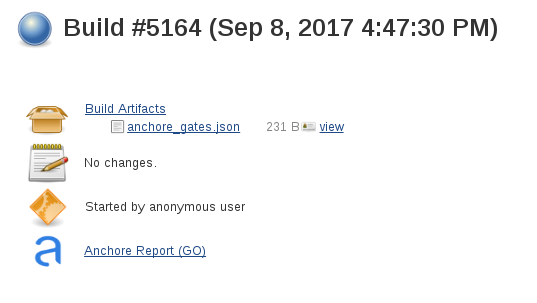
The plugin creates an Anchore Report directory that includes a JSON file with the results of the policy evaluation.
The status of the scan status is indicated in the build summary (GO = Pass, STOP = Fail, WARN=Warning)
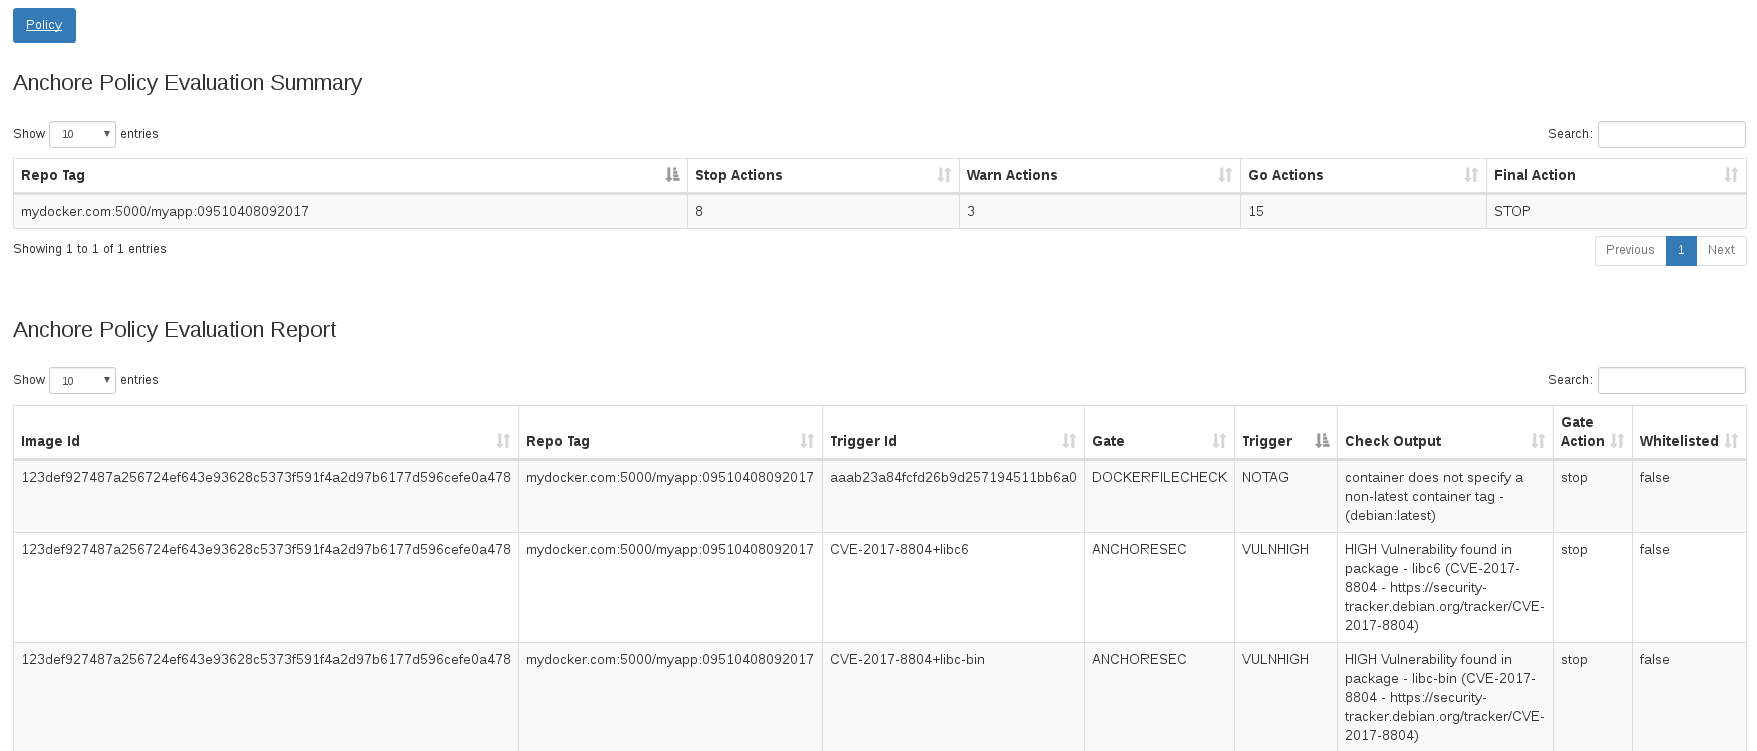
Clicking on the Anchore Report link will render the vulnerabilities and policy evaluation in the Jenkins web UI


