Test and monitor your projects for vulnerabilities with Jenkins. Officially maintained by Snyk.
To use the plugin up you will need to take the following steps in order:
- Install the Snyk Security Plugin
- Configure a Snyk Installation
- Configure a Snyk API Token Credential
- Add Snyk Security to your Project
- Run a Build and View Your Snyk Report
- Go to "Manage Jenkins" > "Manage Plugins" > "Available".
- Search for "Snyk Security".
- Install the plugin.
- Go to "Manage Jenkins" > "Global Tool Configuration"
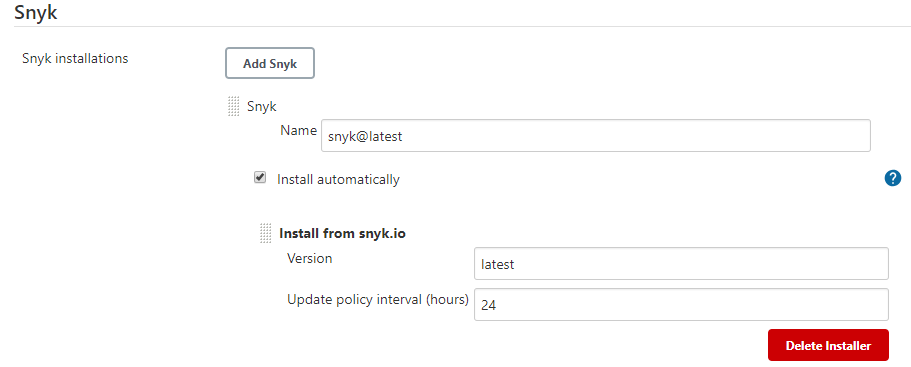
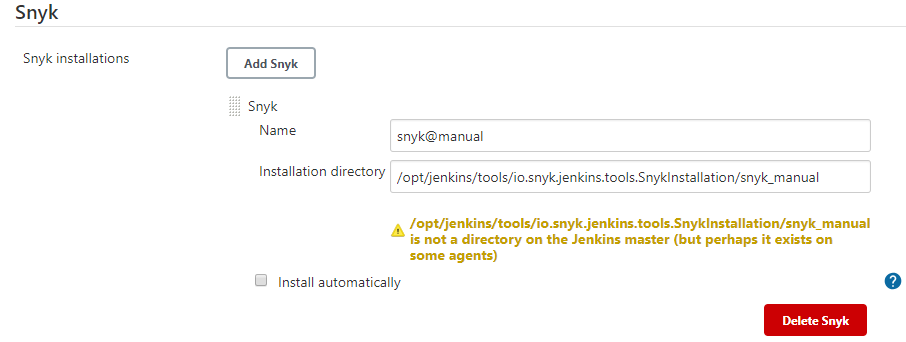
- Add a "Snyk Installation"
- Configure the Installation
- Remember the "Name" as you'll need it when configuring the build step.
The plugin can download the latest version of Snyk's binaries and keep them up-to-date for you.
- Download the following binaries. Choose the binary suitable for your agent's operating system:
- Place the binaries in a single directory on your agent.
- Do not change the filename of the binaries.
- Make sure you have the correct permissions to execute the binaries.
- Provide the absolute path to the directory under "Installation directory".
By default, Snyk uses the https://snyk.io/api endpoint. It is possible to configure Snyk to use a different endpoint by changing the SNYK_API environment variable:
- Go to "Manage Jenkins" > "Configure System"
- Under "Global Properties" check the "Environment variables" option
- Click "Add"
- Set the name to
SNYK_APIand the value to the custom endpoint
Refer to the Snyk documentation for more information about API configuration.
- Get your Snyk API Token
- Go to "Manage Jenkins" > "Manage Credentials"
- Choose a Store
- Choose a Domain
- Go to "Add Credentials"
- Select "Snyk API Token"
- Configure the Credentials
- Remember the "ID" as you'll need it when configuring the build step.
This step will depend on if you're using Freestyle Projects or Pipeline Projects.
- Select a project
- Go to "Configure"
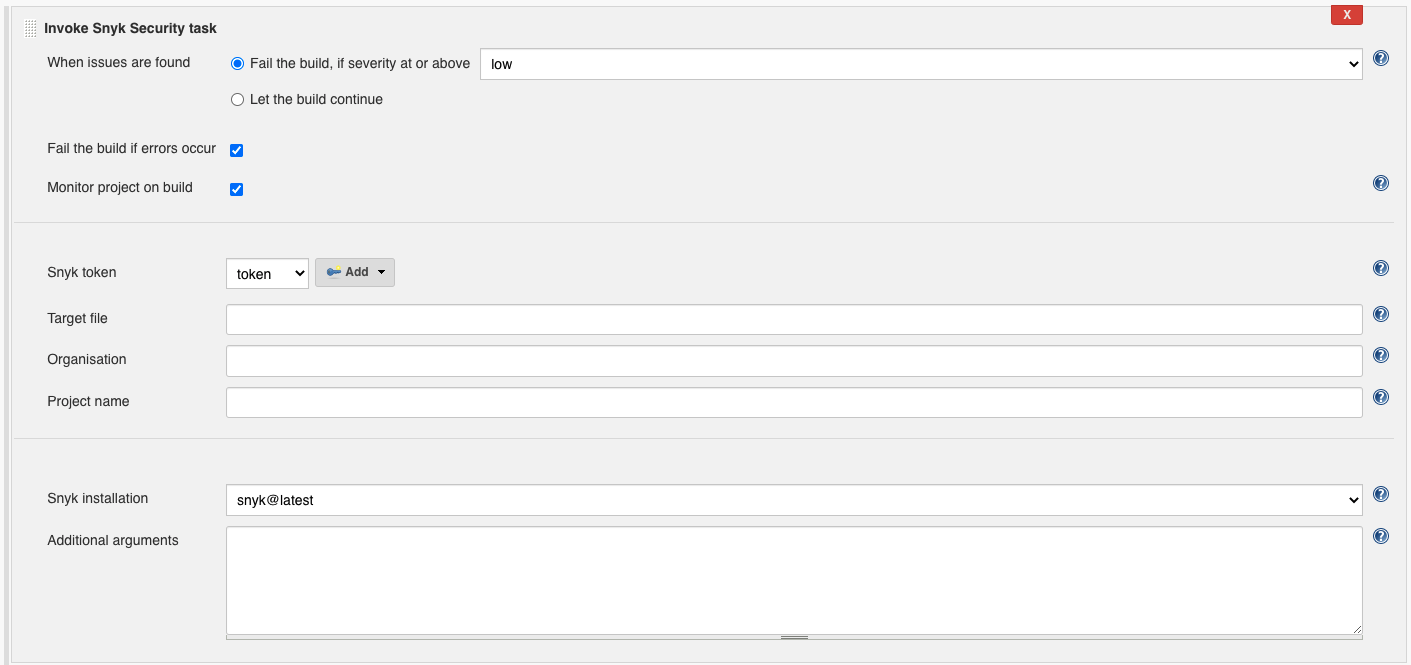
- Under "Build", select "Add build step" select "Invoke Snyk Security Task"
- Configure as needed. Click the "?" icons for more information about each option.
Use the snykSecurity step as part of your pipeline script. You can use the "Snippet Generator" to generate the code from a web form and copy it into your pipeline.
📷 Show Example
pipeline {
  agent any

  stages {
    stage('Build') {
      steps {
        echo 'Building...'
      }
    }
    stage('Test') {
      steps {
        echo 'Testing...'
        snykSecurity(
          snykInstallation: '<Your Snyk Installation Name>',
          snykTokenId: '<Your Snyk API Token ID>',
          // place other optional parameters here, for example:
          additionalArguments: '--all-projects --detection-depth=<DEPTH>'
        )
      }
    }
    stage('Deploy') {
      steps {
        echo 'Deploying...'
      }
    }
  }
}
You can pass the following parameters to your snykSecurity step.
Snyk Installation Name. As configured in "2. Configure a Snyk Installation".
Snyk API Token Credential ID. As configured in "3. Configure a Snyk API Token Credential".
If you prefer to provide the Snyk API Token another way, such using alternative credential bindings, you'll need to provide a "SNYK_TOKEN" build environment variable.
Whether the step should fail if issues and vulnerabilities are found.
Whether the step should fail if Snyk fails to scan the project due to an error. Errors include scenarios like: failing to download Snyk's binaries, improper Jenkins setup, bad configuration and server errors.
The Snyk Organisation in which this project should be tested and monitored. See --org under Snyk CLI docs for default behaviour.
A custom name for the Snyk project created for this Jenkins project on every build. See --project-name under Snyk CLI docs for default behaviour.
The path to the manifest file to be used by Snyk. See --file under Snyk CLI docs for default behaviour.
The minimum severity to detect. Can be one of the following: low, medium, high , critical. See --severity-threshold under Snyk CLI docs for default behaviour.
See Snyk CLI docs for information on additional arguments.
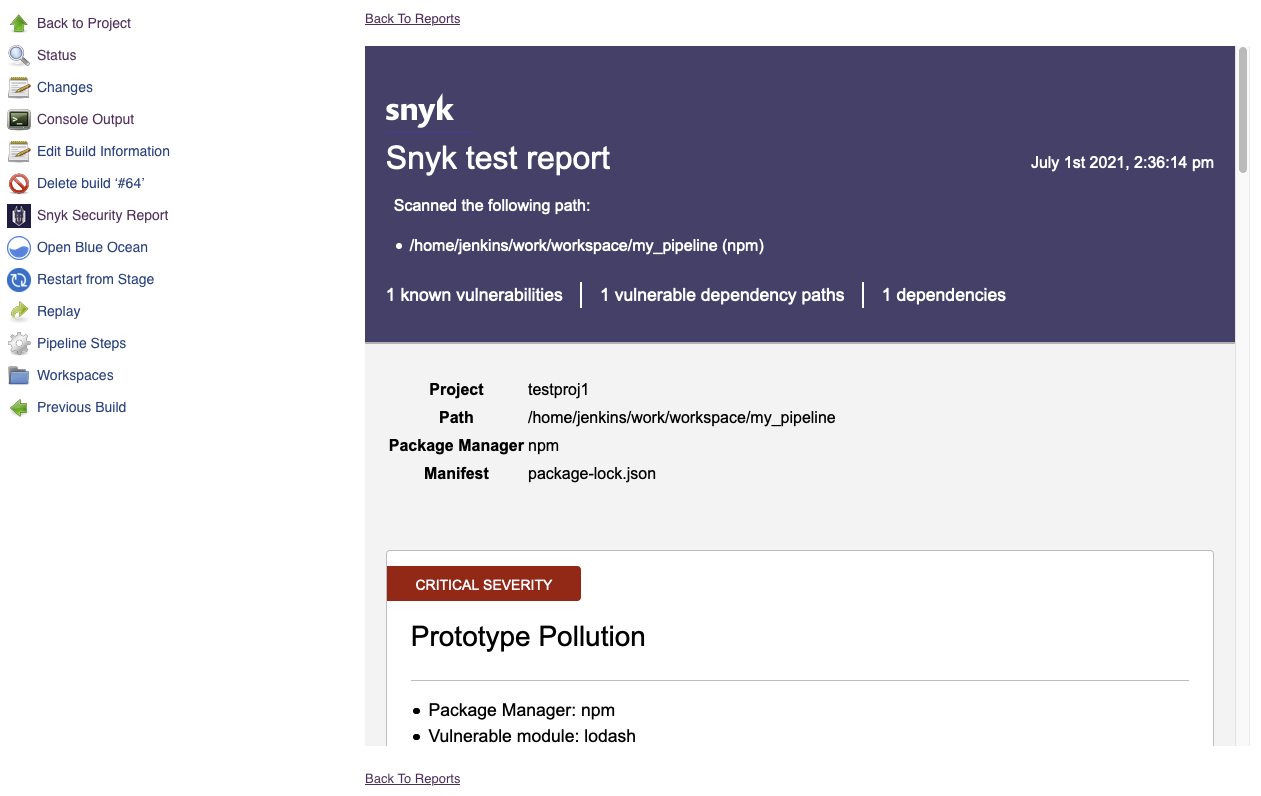
- Complete a new build of your project.
- Go to the build's page.
- Click on "Snyk Security Report" in the sidebar to see the results.
If there are any errors you may not see the report. See Troubleshooting.
To see more information on your steps, you can increase logging and re-run your steps.
- View the "Console Output" for a specific build.
- Add a logger to capture all
io.snyk.jenkinslogs. Follow this article . - Add
--debugto "Additional Arguments" to capture all Snyk CLI logs. Debug output is available under "Console Output" for your build.
By default, Snyk Installations will download Snyk's binaries over the network from downloads.snyk.io and use static.snyk.io as a fallback. If this fails there may be a network or proxy issue. If you cannot fix the issue, you can use a Manual Installation instead.
To ensure the long-term stability and quality of this project, we are moving to a closed-contribution model effective August 2025. This change allows our core team to focus on a centralized development roadmap and rigorous quality assurance, which is essential for a component with such extensive usage.
All of our development will remain public for transparency. We thank the community for its support and valuable contributions.
GitHub issues have been disabled on this repository as part of our move to a closed-contribution model. The Snyk support team does not actively monitor GitHub issues on any Snyk development project.
For help with Snyk products, please use the Snyk support page, which is the fastest way to get assistance.


